
How to align your car headlights ahead of an MOT check
By law, every year (after your car is three years old) you must pass an MOT check to prove that your car is safe, operational and roadworthy enough to drive on the UK’s roads. It is essential that you pass your MOT to be able to drive legally. You are unable to drive without an MOT.
In 2016, the government changed the way in which they test headlight aim in an MOT check, with a new emphasis on headlight alignment. In this article we are going to run down how you can align your headlights and make other minor preparations before your MOT.
There are some preparations that you can make, in order to give your vehicle, the best chance in passing its MOT. All of the preparations that you can make to your vehicle are minor adjustments that can make all the difference when your car undertakes its MOT check.
If you are due an MOT please click the link below. We also have an MOT reminder service and if you are unsure when your MOT is due, please click the following article: MOT date check
Related: Book an MOT
How to align your headlights?
Before checking your headlights, to prepare your car for this, you will want to remove any weight out of your car, including the boot.
This is to ensure that you get a correct reading. You will also want to make sure that your tyres are at the correct tyre pressure and the shock absorbers are working correctly. The shock absorbers can be tested by bouncing each corner of your car. Once this is done park 60cm away from a wall, head on.
Now that you have put your car in the correct position and made all the necessary checks, you can turn your standard headlights on. The headlights should now be shining onto the wall, producing a circle shape. You will want to mark on the wall with a pencil or tape 4 points. 2 points will be from the top of the circle to the bottom. The other 2 points should be on the left and right side of the circle. Where the two lines meet is the centre of your headlights.
Please see the image below for reference when conducting this first headlight check.
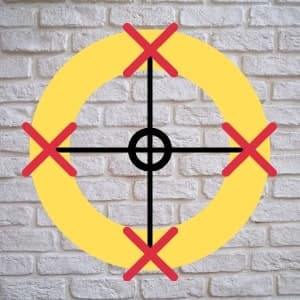
Once you have done this for both the car headlights, if the headlights are properly aligned, both centre points should be the same height.
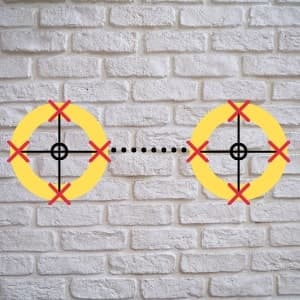
Now reverse about 8 metres with the car headlights still on. If the middle of your lights are above, below or either side of these markings you will need to realign them.
To realign the car headlights, begin by finding the headlight adjustment screws. The screws are located within the housing of the headlights, however, every car is different so you may find this information in the cars manual.
Adjust the headlights by loosening the screws and manually moving the bulb by hand. Ensure that the lights are turned off whilst doing this, then turn them on to see if you have adjusted them to the correct position.
What other preparations can I make before my MOT check?
Before sending your car in for a MOT there are some checks that you can complete to give it the best possible chance.
Tyres
The main preparation that you can do for your tyres is to check the tread depth. The minimum legal tread depth for tyres in the UK is 1.6mm. If the tyres have a tread depth of below 1.6mm then your car will be destined to fail the MOT check. You can check the tread depth by using the 20p test. Put the 20p in the tyre tread and if the rim round the edge of the coin is visible, the tyres need replacing before the MOT. As well as checking the tread depth, you will want to look for any damage on the tyres that my impact the result of the MOT.
Related: Tyres at National
Exhaust
The exhaust must be checked before the MOT for two reasons. The first reason is to check how much emissions are being expelled into the atmosphere. You cannot tell this exact but you can get a good idea if you start your engine and lots of smoke can be seen leaving the exhaust, the chances are that this will have an impact on the emission test performed in the MOT.
Related: How to reduce diesel emissions
Your exhaust must also be free from corrosion and if you hear rattling coming from the exhaust, it is a sign that there may be an issue. It is hard to check the condition of the exhaust and emissions without specialist equipment but it will give you a good idea of how well your vehicle will perform in the MOT in this area.
Related: Exhausts
Brakes
As for the brakes there are a few things that you can do to check that they are all in working order. Start by opening the bonnet and check that the brake fluid is at the correct level. You will also want to check the handbrake. If you have to pull up the handbrake far and you hear lots of clicking, then the tester cable may need tightening.
As with the same with the exhaust, specialist equipment will be needed to properly check the brakes, but the above steps are good to check before an MOT.
Related: Book a brakes check
General Car Maintenance
Before your MOT check, you will want to make sure that all the general instruments such as the horn, indicators, seatbelts and wiper blades (https://www.national.co.uk/wiper-blades) are all in good working condition. As well as this, you will also want to check on the condition of the exterior of your car, making sure that it is all secure and all the doors can open and close with ease.
Related: Identify wear and tear on your car
To book your MOT at your local National Tyres and Autocare branch, please click on the link below.
Related: Book an MOT
Did you enjoy this blog post? |
7 people found this review helpful














 Sign up for SPECIAL OFFERS